See details of post Visually understanding your site structure and external link weight impact below

They say a picture is worth a thousand words — and wow, are they correct!
Today, I’m going to illustrate powerful ways to visualize your site structure, specifically as it relates to pages that acquire incoming links; however, we’ll also discuss other applications of this technique using analytics metrics or other third-party data.
There are a number of reasons you would want to do this, among them to provide a visual context to data. As we will see below, visual representations of data can assist in quickly identifying patterns in site structures that may not be evident when viewed as a spreadsheet or as raw data. You can also use these visuals to explain to clients and other stakeholders what’s going on in a site structure.
To build a visual representation of our site structure as it relates to incoming links, we will be:
- running Screaming Frog to gather internal page data and link structure.
- adding the number of backlinks each page has to the page’s metrics.
- using Gephi to create a visual representation of this data.
For those unfamiliar with Gephi, it’s an open-source data visualization tool — basically, it turns data into an interactive picture.
Getting your core data
Regardless of whether you want to visualize your site structure relative to your site traffic or another metric, the process is essentially the same. So, let’s begin by…
Collecting your internal link structure
The first step is to download Screaming Frog if you don’t already have it installed. For sites under 500 URLs, the free version will suffice; those with larger sites may want to purchase the premium version, though they can still use the free version to get some rough ideas of what their site structure is doing.
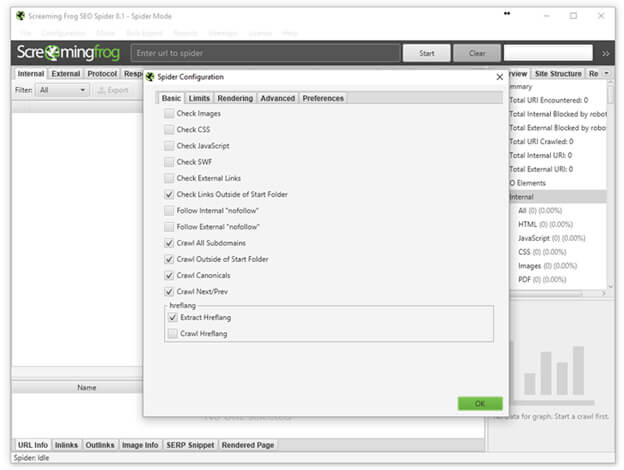
Now, use Screaming Frog to crawl the site you want to map. You don’t need to collect the images, CSS, JavaScript and so on, so the spider configuration should look like the screen shot below. (However, you will want to make your own decisions about whether you want to crawl subdomains and so on, based on your needs and site structure.)
Enter the domain you want to check and click “Start.” Once the crawl is completed, it’s time to export the data and clean it up a bit. To do this, simply go to:
Bulk Export > Response Codes > Success (2xx) Inlinks
Once downloaded, open the file and do the following:
- Delete the first row containing “All Inlinks.”
- Delete the first column, “Type.”
- Rename the “Destination” column “Target.”
- Delete all other columns besides “Source” and “Target.”
- Save the edited file. You can name it whatever you’d like, but I will be referring to mine throughout the article as working.csv.
I highly recommend scanning through your Source and Target columns to look for anomalies. For example, the site I crawled for the screen shots below contained anchor links on a large number of pages. I did a quick search for the hashtag in the Target column and deleted those so they didn’t skew my link flow information.
With this, we are left with a spreadsheet that should look something like this:

This data alone can be pretty cool to analyze — and to that end, I recommend reading Patrick Stox’s article, “Easy visualizations of PageRank and Page Groups with Gephi.”
In his article, Stox used Gephi to visualize the relationships between pages on a website and to see which pages are the strongest (based on the site’s internal link graph).

You can read his article for directions and a description, but in short, what we’re seeing is different “clusters” of pages (based on which pages link together most often — not perfect but not bad), grouped by color and sized by internal links (with the most linked-to pages appearing larger).
This information is handy, to be sure. But what if we want more? What if we want to truly color the pages based on their site section, and what if we want them sized by the number of inbound external links?
To achieve this, you’ll first need to download your top linked pages from Google Search Console. If you haven’t done that before, you simply log in to your Search Console account and do the following:
- Click “Search Traffic” in the left nav.
- Click “Links to Your Site” in the menu that opens.
- Click “More >>” under the column “Your most linked content.”
- And “Download this table.”
The only problem with the data as it’s downloaded is that for our purposes, we need the URLs in the form of a domain, and the table only displays the path. To deal with this easily, you can simply:
- Open the spreadsheet.
- Insert a new column A before the URL path.
- Put your domain https://www.yourdomain.com/ in cell A3 (assuming B2 contains your domain which oddly is the only URL to display fully) so that you don’t create https://www.yourdomain.com/https://www.yourdomain.com/.
- Double-click the bottom-right corner of the cell with your recently added domain to copy the domain to the bottom of the spreadsheet.
- Select the data from columns A and B (the domain and the path) and copy it to Notepad.
- Find and Replace “/ /” with “/” (excluding quotes).
- Select all in the Notepad.
- Past that into column B and delete column A.
- Now you have the same list but with the full URL.
Getting the data into Gephi
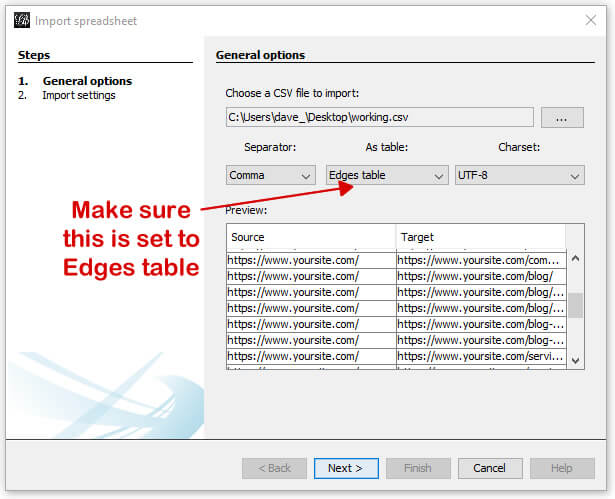
Here, we’ll be uploading the Source/Target CSV file we created earlier and named working.csv. This will create the edges and nodes Gephi needs to create the graphs. (For our purposes here, a node is a page, and an edge represents the link between pages.) To import the spreadsheet, simply open Gephi and go to: File > Import spreadsheet.
A new window will open where you will select your working.csv file and select “Edges table” (since we’re importing the connections between the pages). It will look like:
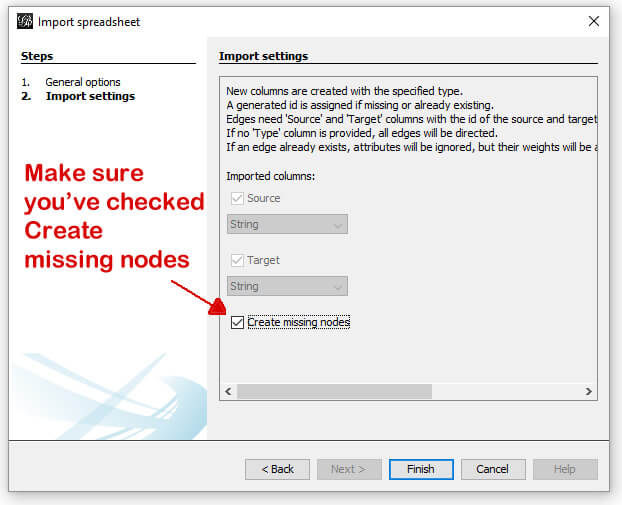
In the next screen, you’ll be shown a couple of options (very limited in this example). Simply make sure the “Create missing nodes” box is checked, and click next.
Assuming it opens to the Overview tab (which it should on first use), you’ll be presented with something that looks like:
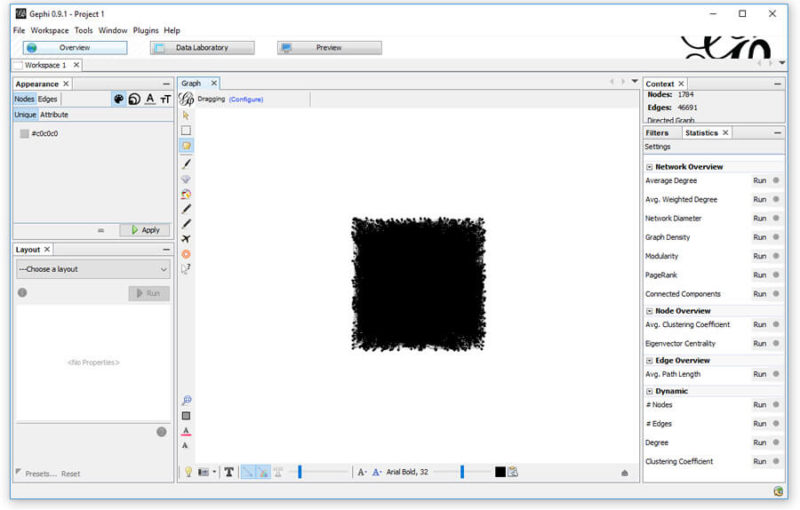
A bit messy, and we’re not going to clean it up yet. First, we’re going to head over to the Data Laboratory and export the Nodes (read: pages).
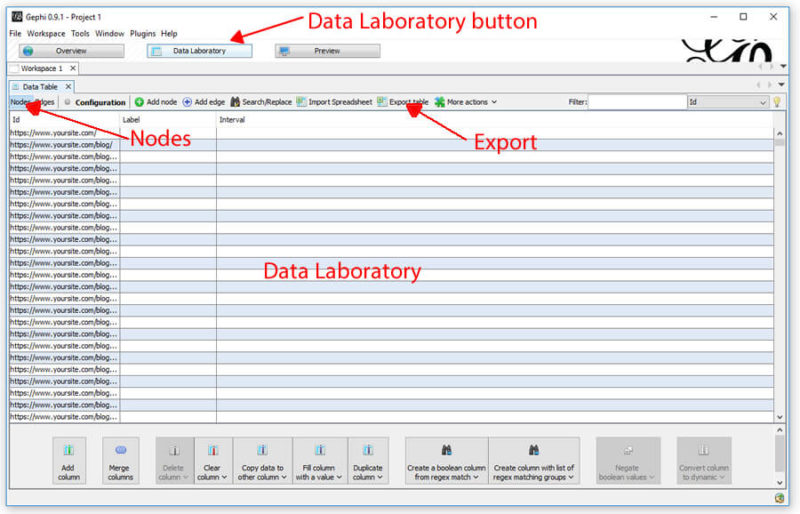
Once in the Data Laboratory, make sure you’re looking at the Nodes by clicking the Nodes button near the top left. Once there, simply export the table so you have a csv of all your nodes.
When you open the csv, it should have the following columns:
You’ll add a fourth column named after whichever metric you want to pull in. Here, I’m going to pull in the referring domains as reported in the Search Console, so I will label the fourth column (D) “referring domains.” The fifth will be “modularity_class.”
You’ll want to temporarily add a second sheet to the spreadsheet and name it “search console.”
In cell D2 (right below the column D heading), enter the following formula:
=IFERROR(INDEX(‘search console’!$C$2:$C$136,MATCH(A2,’search console’!$A$2:$A$136,0),1),”0″)
In my example here, there are 136 rows in my Search Console data. Yours may differ, in which case the 136 in the formula above should be changed to the number of rows in your list. Additionally, if you wanted to list your link counts and not referring domains, you would change the Cs to Bs so the search is across column B instead of C.
Once completed, you will want to copy the referring domains column and use the “Paste Values” command, which will switch the cells from containing a formula to containing the value of their number of referring domains as an integer.
The process looks like:

Now, finally, you want to add a fifth column with the heading “modularity_class.” Although Gephi has modularity built in, which will cluster similar pages together based on the internal link structure, I prefer a more manual approach that clearly defines the page’s category.
In my example, I’m going to assign one of the following values to each page in the modularity_class column, based on the page category:
- 0 – misc/other
- 1 – blog posts
- 2 – resource pages
- 3 – company info
- 4 – service
- 5 – homepage
How you break your categories out will, of course, depend on your site (e.g., you might break up your e-commerce site by product type, or your travel site by location).
Once you’ve saved this as a csv named nodes.csv, you simply need to import this spreadsheet into the current Gelphi project using the Import Spreadsheet button on the Data Laboratory screen you exported from.

On the next screen, you’ll make sure “referring domains” and “modularity_class” are set to Float and make sure the “Force nodes to be created as new ones” box is unchecked. Then click “Next.” Once imported, you’ll be looking at a page like:

You’ll then click back to the Overview at the top of Gephi. At this point, you’ll notice that not a lot has changed… but it’s about to.
There’s a ton you can do with Gephi. I recommend running the PageRank simulation, which you’ll find in the Settings on the right-hand side. The default settings work well. Now it’s time to use all this data.
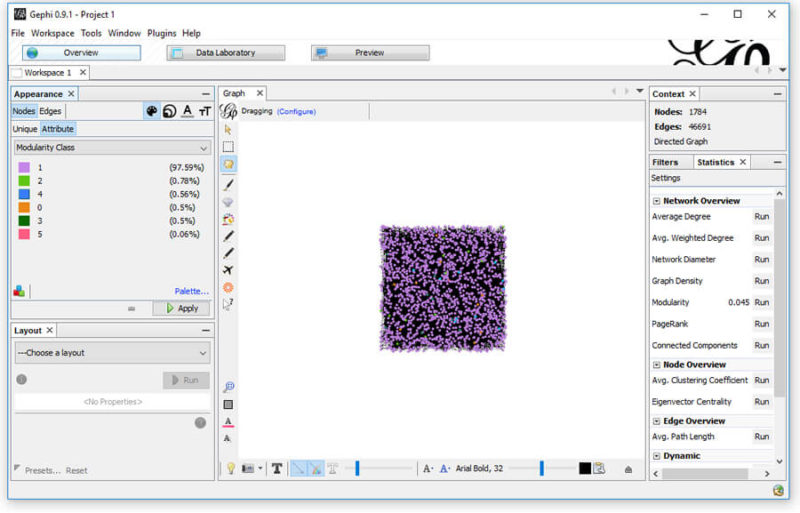
First, we’ll color the nodes based on their page type (modularity_class). In the top left, select “Nodes,” then “Attribute.” From the drop-down, select “Modularity Class” and choose which color you’d like representing each. From my example above, I’ve opted for the following colors:
- misc/other — orange
- blog posts — light purple
- resource pages — light green
- company info — dark green
- service — blue
- homepage — pink
This will give you something close to:
Now, let’s use those referring domains to size the Nodes. This time, we need to select to size the attribute “referring domains.” To do this, select the sizing icon; then, in the Attributes, select “referring domains” and set a min and max sizing. I like to start with 10 and 50, but each graph is unique, so find what works for you.
If you find that “referring domains” is not in the list (which happens sometimes), it’s an odd glitch with an equally odd workaround — and credit to rbsam on Github for it:
On Appearence/Attributes by color you can set the attribute to Partitioning to Ranking on the bottom left of the window. If the attribute is set to Partitioning it will not appear on Size attribute. If it is set to Ranking it will appear on Size attribute.
What this means is…
All right, so now we’ve got things color-coded by the various sections of the site and sized by the level of incoming links to the page. It still looks a bit confusing, but we’re not done yet!
The next step is to select a layout in the bottom left. They all look a bit different and serve different functions. My favorite two are Fruchterman Reingold (shown below) and Force Atlas 2. You can also toy around with the gravity (that is, how much the edges pull the nodes together). The current site appears as:

Just this information can give you a very interesting view of what’s going on in your site. What’s important to know is that when you right-click on any node, you can opt to select it in the data laboratory. Want to know what that lone page up at the top is and why it’s only got one lonely link to it? Right-click and view it in the data laboratory (it’s a sitemap, FYI). You can also do the same in reverse. If you don’t see an individual page appearing, you can find it in the data laboratory and right-click it and select it in the overview.
What this visualization gives us is an ability to quickly locate anomalies in the site, figure out which pages are grouped in specific ways, and find opportunities to improve the flow of PageRank and internal link weight.
And you’re not this limited
In this article, we’ve only looked at one application, but there are numerous others — we simply need to use our imaginations.
Why not pull your Moz Page Authority or Google Analytics incoming organic traffic and use that as the sizing metric to view which sections of your site get the most traffic and help spot problems in your internal linking structure?
view the original article here
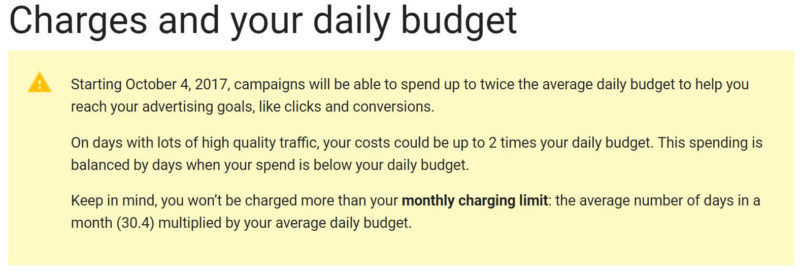
 On Wednesday afternoon, Google AdWords notified advertisers in their accounts and on Twitter that a change had already happened to the way budgets get handled on a daily basis. It is not going over well.